**TEALS Program**
Home |
Curriculum Map |
Discussions |
Change Log
# Welcome to Snap!
Snap! is a programming language, which you can use to tell a computer what to do. A program is a particular set of instructions for the computer to follow.
Programs in most languages use only letters (and punctuation), but Snap! is different: it's a visual language. Instead of writing a program only using the keyboard, you will drag pictures of blocks and snap them together. In Snap!, programs contain multiple scripts. We will use this terminology going forward.
The following is a script in Snap!:
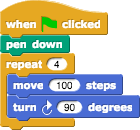
Can you guess what it might do? (Write your guess below)
____________________
## Part 1 - Blocks
The area at the left edge of the window is the **palette**. As you see in the picture, it contains pallettes for eight different-color block pallettes. In this lab, we will focus on the Motion, Sound, Pen, and Sensing pallettes. You will learn about the other pallettes in the next few labs.
These pallettes are an important organizational structure in Snap! because they are home to the various blocks that you will use to tell the computer what to do. The blocks are categorized under each pallette based on what kind of thing each block does.
1. Below, fill in the name of the pallette to which each block belongs.
| Block | Pallette |
| ------------------------- | -------- |
|  | |
|  | |
|  | |
|  | |
|  | |
|  | |
|  | |
|  | |
Look at the **Motion** pallette. Under this pallette you will find a bunch of blocks that correspond to motion-like actions. For example, click on the **Move** block, drag it to the scripting area, and drop it anywhere in the scripting area.


The block that you just dragged and dropped into the scripting area controls something that we call a sprite, which is the arrowhead-looking thing in the middle of the stage (the white part of the window).
Back to the scripting area, if you click on the **Move** Block you just put there, the sprite will move 10 steps. You can see this visually depicted by the sprite moving in the stage. You can vary the input of the block, i.e., the number 10, to change the number of steps you want to the sprite to move.

2. How can you change the block input so that the sprite moves in the opposite direction?
## Part 2 - Scripts
Now that you have figured out how to make a sprite move, you might be wondering how to make the sprite do other things as well. To make a sprite do more than just move, we need to use different types of blocks and link them together. You can link blocks by snapping them together. Drag a block right underneath the one to which you want to attach it. Blocks will snap together when one block's indentation is near the pallette of the one above it. You should see a white bar appear like the one in the image below, which just shows you where the block will go after you drop it.
If you keep attaching blocks together in this way, you will create a script. A program consists of one or more of these scripts.
1. Try recreating the following script in the scripting area in Snap!.
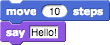
The purple say... blocks are available from the **Looks** pallette.
Remember, a script will tell the sprite what to do. Click on the script and see what happens. You will know that your script is running if it has a highlighted border around it:
2. What happens when you run this script?

Be sure to note: _blocks in a script run in a specific order, from the top of the script to the bottom_. Generally, Snap! waits until one block has finished its job before continuing on to the block below it. (One common exception is blocks that play sounds: a block's job can be to start the sound, which means the block below it will execute while the sound is still playing.
## Part 3 - Reporters
At the bottom of **motion** palette are three blocks shaped differently from the others. The oval-shaped **x-position** and **y-position** are called _reporters_. (We don't need the third one right now.) Unlike the jigsaw-puzzle-piece-shaped command blocks we've used until now, reporters don't carry out an action (such as moving the sprite or displaying a speech balloon) by themselves. Instead they report a value, usually for use in another block's input slot.
 
These particular reporters tell you where the sprite is on the stage. As in algebra class, **x** means left-to-right position, and **y** means bottom-to-top position.
Drag your sprite to the far right side of the stage. Next, drag an x position block into the scripting area and click on it. You should see a little speech balloon next to the block:

1. What value does the **x position** block report to you when the sprite is?
...at the far right side of the stage:
...in the center of the stage:
...at the far left side of the stage:
Click on the gray box to the left of the **x-position** block in the palette, and then look over to the stage. You will see that the value that the block would report is displayed on the stage:


This on-stage display is called a _watcher_.
The **x-position** block and the **y-position** block will tell you the position of your sprite on the screen. Move the sprite around and the values reported by these blocks change.
 
## Part 4 - Experiment with drawing commands
Try to get comfortable with the blocks under the **motion** pallette and the **pen** pallette. Figure out what each one does and try to use these blocks to draw a square or a simple picture.
1. What do these blocks do? (write an explanation next to each block)?


2. Does the **turn** block change the sprite's x and/or y position?
3. Using these blocks, draw a square. Write the blocks you used below.
_Tips and Tricks:_
Once the pen is down, it stays down even in a different script. Use the **pen up** block to lift the pen so that no lines will be drawn.
You also will want to show the direction and x and y position of the sprite. In the **motion** pallette, you can select for these to be shown on the stage as described in the reporters activity you saw earlier in the lab.
## Part 5 - Follow that mouse

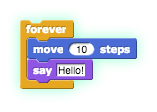
1. What do you think the script above will do?
Hint: **mouse x** and **mouse y** are reporters in the **sensing** palette; they tell you where the mouse is pointing.
 
Copy the script into Snap!, and click on the **forever** block to run it.
* Did it follow your expectations (Yes/No)?
2. What happens when you drag the mouse to a different part of the screen while the script is running?
3. How does script's behavior change when you modify the **go to** block as shown below?

## Part 6 - Forever and a day
From the previous exercise, you may have figured out what the `Forever` block does. The `forever` block is the first block you have seen that holds, or wraps around, other blocks. We call this a _C block_ because of its shape. As the name `forever` implies, it will run the blocks inside it again and again and again and ... well, forever. You will find this block under the **control** pallette.

Will a **forever** block ever stop?

Not unless you tell it to: Click on the stop sign icon on the upper right hand corner of the Snap! window.

This stop sign will stop all scripts that are running in any sprite. This is equivalent to executing the **stop all** in the **control** palette.

## Part 7 - Make a Kaleidoscope
Explore this drawing script for a little bit (). Press the spacebar to run the script, and move your mouse cursor over the stage of the Snap! window. While over the stage, use the **d** (pen down), **u** (pen up), and **c** (clear) keyboard keys to change what gets drawn on the screen. The script that causes the sprite to follow the pointer is

As you can see, this drawing script features more **Control** blocks, in addition to the **forever** block first introduced in the _Follow the Mouse activity_. These _hat_-shaped block, which can be used only at the beginning of a script, indicate when a specific script should be run.
## Part 8 - Kaleidoscope activity

The kaleidoscope consists of four sprites. Each sprite will be drawing with a different pen color. Each sprite's movement is based on the movement of the mouse. The first sprite follows the mouse, just like in the example we looked at before. The other three sprites move around as the mouse moves, but reflected over the X and Y axes.
Save your project as _lab1.1_.
Some tips:
* You will need four sprites. (We haven't used more than one sprite up to now, but having more than one allows for more interesting projects, as you'll see.) The easiest way to create three more is to _duplicate_ the one you have. Right-click the sprite in the sprite corral, and select **duplicate** from the _context menu_ that appears. Each duplicated sprite will have exactly the same scripts as the original, which is why we suggest duplication rather than just creating more sprites from scratch.
* You can change the color of each sprite by clicking the color input in that sprite's `set pen color` block (found under the **Pen** pallette), choosing a color, and then clicking on the block itself (to run the block and actually set the color). Don't worry about matching the colors in the animation exactly!

* Pay close attention to what each of the other sprites is doing in the animation above. You will need to modify the **x** and **y** inputs in each sprite's `go to x-y` block using simple formulas, with `addition`and `subtraction`.


>Hint: All the sprites are reflecting in different ways around the (x=0, y=0) origin point of the stage.**
* Once you figured this out, try out some complicated formulas and/or more sprites, and share with your classmates
## Grading rubric
| **Day 1 criteria** | Points |
| :--------------- | -------------- |
| 1.1 What does it do? | 2 |
| 1.2 Categories | 4 |
| 2.1 Move in opposite direction | 1 |
| 2.2 What happens | 2 |
| 3.1 x positions | 3 |
| 5.1 What it does | 3 |
| 5.2 Does turn block change x or y position | 1 |
| 5.3 Draw a square | 4 |
| 6.1 What does it do | 2 |
| 6.2 Dragging the mouse | 1 |
| 6.3 script behavior w/modification | 1 |
| **Total** | **24** |
| **Day 2 mini-project** | |
| 8 Make a kaleidoscope | 8 |
| **Total** | **6** |
| **Project total** | **30** |